Valohai is the enterprise-grade machine learning platform for data scientists that build custom models by hand. In addition to writing code with classic IDEs like PyCharm or VSCode, we also have native support for data scientists preferring to use Jupyter notebooks.
In the past weeks, the Valohai Jupyter extension (Jupyhai) has received several updates. In this blog post, we introduce the most important ones.
Adjustable package contents
When the user clicks on the Create Execution menu item, Jupyhai packages the notebook and all relevant files from your hard disk and sends them to your cloud instance for execution.
With previous versions, all files and folders in the notebook folder were packaged every time you created and execution. After analyzing user feedback, we decided to give more control for what is packaged and what is not.
Firstly we removed the dependency for the notebook path. In the new version, all files & folders from the server root up are packaged by default. This means that even regardless of your notebook path, everything in the notebook server folder structure is packaged.
In addition to widening the packaging coverage to include the entire folder structure, we created a new setting for ignoring files that you don’t want to package. For example, if you have a lot of big log files in /log , you can simply ignore those by adding a new row in the ignore setting. Or perhaps you don’t want any of the other notebooks included; then you can add *.ipynb . This resembles how the .gitignore file works in git.

Improved execution feedback
With our previous versions, after starting a new execution, there was often some lag with zero feedback. What was happening behind the scenes was that Jupyhai was packaging files to be sent to Valohai for cloud execution.
Due to the lag and no visible logging, it was hard for the user to know if something went wrong, as packaging can sometimes take a while or even fail in some cases.
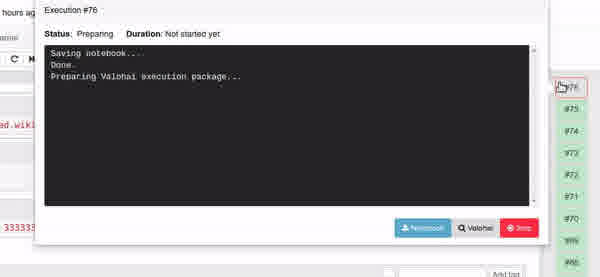
We have improved this by showing the new execution as a new box gizmo immediately after the packaging has started. Also, if you click the gizmo, you see a progress report for the packaging process before it is even sent to Valohai.
Combined docker image
In the past, you needed two separate docker images. One for running the Jupyhai powered notebooks locally on your laptop and another docker for the cloud execution in Valohai.
We have now combined these into one single docker image, which means that the docker image valohai/jupyhai also contains all the bells and whistles needed for a cloud execution.
As a result of this, you can base your own Docker image on valohai/jupyhai and then add your custom needs on top of that. This custom docker then works both as a local notebook server as well as an environment for the Valohai cloud execution. It is easier to maintain one docker image for a project than two. Note that it is still possible to keep the separation and use two different images if that is necessary for your use-case.
Example Dockerfile:
FROM valohai/jupyhai
USER root
RUN pip install tensorflow
With this example image, you could run a Valohai powered notebook with TensorFlow support locally and use the same image for cloud executions, too!

